Low-cost Django deployment with Google App Engine and Cloud SQL
I was looking for a low-cost solution to deploy a basic Django app on Google.
The app does not have a lot of traffic, and while I would like to be able to scale, if necessary, my first objective is to find a solution as cheap as possible when the app is not used.
My first idea was to use Google Cloud Run, which is great to deploy a docker image very easily. Deploying automatically using Google Cloud Build was easy to set up, and the billing model, where we pay only for the time we use the app is interesting. And with the free tier I expected to have no cost at all, which was the case. However, there is a cold start delay anytime we use the app, and if you want your deployment to be always up with at least one replica the cost is high (more than 50 € / month).
I then switched to Google App Engine where the free tier is enough to have zero cost for a low traffic, low resources app. I dislike not being able to build my own docker image, but most web frameworks are well-supported.
In both cases, having a database instance adds some cost.
Keep in mind that this “tutorial” was initially created as a simple note for my own use and might not apply to your use case. Moreover, pricing can change and depends on the region, so your experience might differ from mine.
1 - Setup a Google Cloud Project
A. Create a Google Cloud Project
The first step is to create a Google Cloud Project if you don’t already have one, and take note of the Project ID:
B. Create a Service Account
It is a good practice to create specific service accounts for all tasks, instead of relying on default shared service accounts. It allows us to define permissions with more granularity.
You can create a service account:
The service account will be added on the IAM dashboard:
You can find the service account with the principal
[service-account-id]@[project-id].iam.gserviceaccount.com. You
can define permissions atomically, but I might be easier to add common roles including those permissions. Relevant
roles are:
- Cloud Datastore User (because App Engine will store data in buckets)
- Cloud SQL Client (to access a SQL database)
C. Create a SQL instance
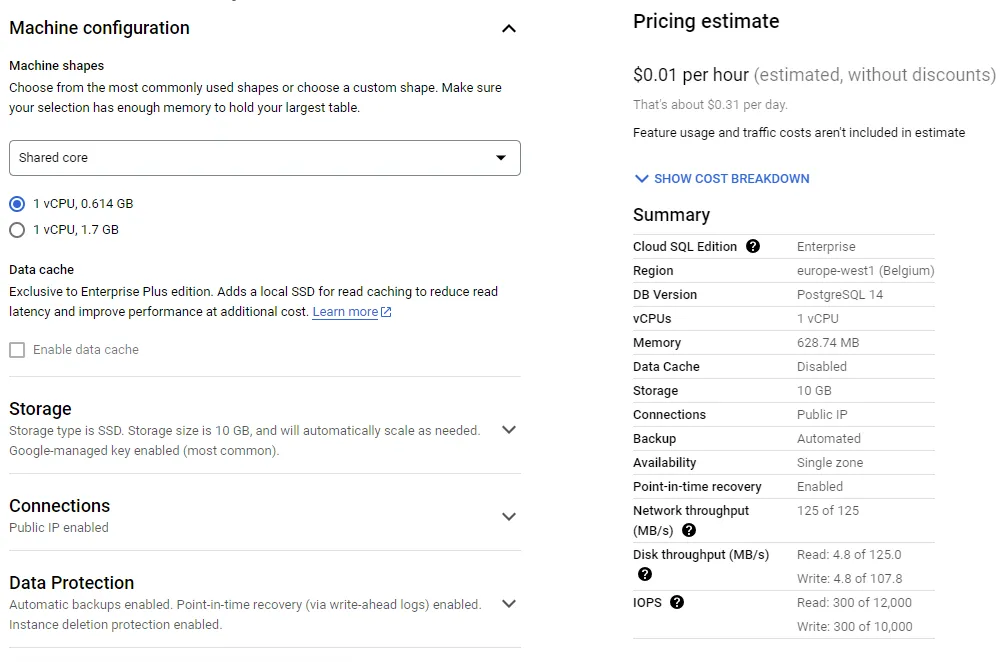
The cheapest database instance I have found on Google Cloud is PostgreSQL. Please note that pricing depends on a lot of factors, including available instance size, or regions. The example I use might not be available for you.
You can choose PostgreSQL here:

D. Add database and user
You can select the new SQL instance:
You will be able to add a Database (take note of the name) and a user (take note of the username and password)
E. Activate App Engine
You might need to activate App Engine from Google Cloud console:
F. Install GCloud CLI
You will need the gcloud CLI command, install instructions are here:
Useful commands:
$ gcloud auth login
$ gcloud components install google-cloud-cli-app-engine-python
$ gcloud config set project [project-id]
2 - Create, configure, and deploy a Django app
A. Basic Django app
This tutorial does not cover how to create a Django app, you can refer to “Writing your first Django app” official tutorial if necessary.
We will assume a settings.py file where variables are read from the environment (e.g. using the environs package).
B. Note on static and media files
Static files (like pictures, css, …) and media files (like user uploads, …) can be managed with various backends. This tutorial does not cover how to implement static and media files management, but I have found practical to use:
- The django-storage package to use a Google Cloud Storage bucket to store media files.
- And the whitenoise package to serve static files.
C. Database configuration
We will assume a settings.py configuration file containing:
DATABASES = {
    'default': {
        'ENGINE': env.str('DATABASE_ENGINE', 'django.db.backends.sqlite3'),
        'NAME': env.str('DATABASE_NAME', str(BASE_DIR / 'db.sqlite3')),
        'USER': env.str('DATABASE_USER', ''),
        'PASSWORD': env.str('DATABASE_PASSWORD', ''),
        'HOST': env.str('DATABASE_HOST', ''),
        'PORT': env.str('DATABASE_PORT', ''),
        'CONN_MAX_AGE': env.int('DATABASE_CONN_MAX_AGE', 0),
    }
}
First, to run locally, with an SQLite database, there is nothing to do, default values are fine.
To use the production database, you must set the following variables:
-
DATABASE_ENGINE
:django.db.backends.postgresql -
DATABASE_HOST
:/cloudsql/[project_id]:[instance_region]:[instance_name] -
DATABASE_PORT
:5432 -
DATABASE_NAME
,DATABASE_USER
,DATABASE_PASSWORD
: See 1 - D. Add database and user
The database host value can also be found in you SQL instances table in the column “Instance connection name”:
D. Remote database while running locally
It is possible to use the remote database while running the app locally, this can be very practical to run the migrations. You will need to download the cloud-sql-proxy tool from Google:
You might need to authenticate and/or set the current project:
$ gcloud auth login
$ gcloud config set project [project-id]
And then you only have to change the DATABASE_HOST configuration variable to 127.0.0.1 while cloud-sql-proxy is running.
E. The app.yaml deployment configuration
The app.yaml file define the deployment, including the class of the runner, and the configuration of the app.
runtime: python312 # Python 3.12

instance_class: F1 # F1 is smaller class, 384 MG / 600 MHz
automatic_scaling:
  min_instances: 1
  max_instances: 1

entrypoint: gunicorn your-app.wsgi -b 0.0.0.0:8080 --preload --worker-class gthread --workers 2 --threads 2

env_variables:
  SECRET_KEY: # ...
  ALLOWED_HOSTS: '[project-id].oa.r.appspot.com'
  CSRF_TRUSTED_ORIGINS: 'https://[project-id].oa.r.appspot.com'

  DATABASE_ENGINE: django.db.backends.postgresql
  DATABASE_HOST: /cloudsql/[project_id]:[instance_region]:[instance_name]
  DATABASE_PORT: 5432
  DATABASE_NAME: # ...
  DATABASE_USER: # ...
  DATABASE_PASSWORD: # ...

# To serve static files (adapt to your settings.py)
handlers:
- url: /static
  static_dir: static/
- url: /.*
  script: auto
You are now ready to deploy the app:
$ gcloud app deploy
F. Additional notes
It is possible to deploy multiple services in App Engine, you just need to add a service entry in the app.yaml file.
It is also possible to use custom domain names:
You can then control the dispatching using a dispatch.yaml file: